The Wiki for Tale 8 is in read-only mode and is available for archival and reference purposes only. Please visit the current Tale 11 Wiki in the meantime.
If you have any issues with this Wiki, please post in #wiki-editing on Discord or contact Brad in-game.
Difference between revisions of "Macro/Automato/Install"
(Created page with "= Game Settings = You must ensure the following is set: '''Self > Options > Interface Options''' * Interface > '''Interface is Small''' * Transparency > HUD Transparency: '''...") |
m (Adding English language flag using the "L" template) |
||
| (2 intermediate revisions by 2 users not shown) | |||
| Line 11: | Line 11: | ||
[[Image:Automato-download.png|frameless|border]] Visit [http://www.dashingstrike.com/Automato/ http://www.dashingstrike.com/Automato/], scroll down to the download section, and download the latest installer | [[Image:Automato-download.png|frameless|border]] Visit [http://www.dashingstrike.com/Automato/ http://www.dashingstrike.com/Automato/], scroll down to the download section, and download the latest installer | ||
| − | = Step 2: Installation = | + | = Step 2: Installation = |
[[Image:Automato-install-icon.png|frameless|border]] Locate the installation file that you downloaded in Step 1 above | [[Image:Automato-install-icon.png|frameless|border]] Locate the installation file that you downloaded in Step 1 above | ||
| Line 49: | Line 49: | ||
[[Image:automato-select-atitd.png]] | [[Image:automato-select-atitd.png]] | ||
| − | Once done, you should have a list of all available | + | Once done, you should have a list of all available macros. |
| + | |||
| + | {{L|en}} | ||
Latest revision as of 04:19, 2 August 2018
Game Settings
You must ensure the following is set: Self > Options > Interface Options
- Interface > Interface is Small
- Transparency > HUD Transparency: 0%
- Transparency > Popup Transparency: 0%
- Transparency > Menu Transparency: 0%
Step 1: Download
 Visit http://www.dashingstrike.com/Automato/, scroll down to the download section, and download the latest installer
Step 2: Installation
![]() Locate the installation file that you downloaded in Step 1 above
Locate the installation file that you downloaded in Step 1 above
File:Automato-install-1.png Choose the path to install (or leave it as the default one given) then click Next
File:Automato-install-2.png Select a Start Menu Folder, enter a new folder name, or select Do not create shortcuts if you do not need or want a start menu folder as part of the installation
File:Automato-install-3.png Wait for all the files to be installed
File:Automato-install-4.png Click Finish to load up Automato straight away (or take the tick out if you don't want to load it up right now)
Step 3: Opening Up
To open up Automato, either use the short-cut created for you during the installation phase, or locate the file Automato.exe in the installation folder.
The program will make internet contact to get the latest version information. Some Internet Security packages may alert you about this. Follow your internet security package instructions to allow this (or not, if you never want the program to tell you of latest updates or to download these changes via the application)
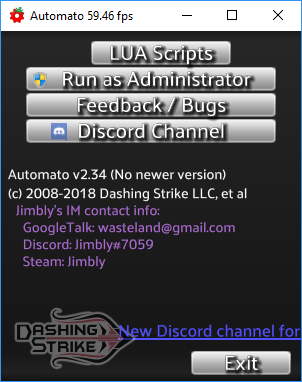
Once opened up, you should see:
Step 4: Keeping Up To Date
Whenever there is a new version, the program will tell you:
File:Automato-update-needed.png![]()
Just click update, go through the screens, then select restart. You should then have the latest version.
Step 5: How to use it
To use the macros, select the LUA Scripts button. Just select "Run as Administrator" before clicking LUA Scripts if you have issues with some features not working as expected.
Once you've clicked LUA Scripts, click on the bar labelled ATITD. (The blue [o] button to the left opens up a windows folder, if a windows folder opens, you've clicked the wrong place - close the windows folder and try to the right a bit).
Once done, you should have a list of all available macros.
