The Wiki for Tale 8 is in read-only mode and is available for archival and reference purposes only. Please visit the current Tale 11 Wiki in the meantime.
If you have any issues with this Wiki, please post in #wiki-editing on Discord or contact Brad in-game.
Guides/Brewing From A Recipe
The easiest way to brew beer is by starting with a recipe that is known to work. The T7 Beer Guide is more useful for understanding the entire process so you can develop a recipe without a handy tool like the Beer Calculator, which I use.
Sources for Locations and Recipes: individual Yeast pages, the T8 beer recipe and yeast location database, and sometimes, the guild or user pages of players interested in brewing.
Gather what you need for each batch: Beer Kettle, Small Barrel, 60 wood, 25 water in jugs, and ingredients such as Honey (H), Light Malt (LM), Burnt Wheat, (BW), etc.
Travel to your brewing location. Plan to spend up to an hour there, waiting for the process to reach certain critical times. The brewing process cannot be paused once it has started. Consider bringing something to do while you wait, I often grow barley for the next time I brew. Not happy about having to travel so far to brew your beer? Want to find a more convenient location? Test for yeasts around your camp. Yeast Testing Guide
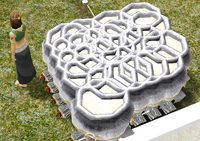
Drop (or build) your beer kettle. The sweeper will not get it. If there is a sign, it is not a bad idea to drop the kettle directly at the center of it. Some yeast locations are quite small, and we only discover the boundaries when we put a kettle too far away and the recipe fails because the correct yeast(s) are not present when the kettle is sealed. Also read the sign. It may include essential information, such as "Drop your kettle southwest of the sign"
Grabbing a random recipe, since its easier to explain with an example. Yeast 56 - Start 15 LM, 20 MM, 75 H / Finish 15 LM, 10 H. Seal @ 1500 for this location.
Brewing:
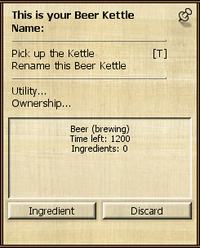
Your kettle is on the ground. Some locations have a public kettle that you can use. Click on it and pin its window. Click the "Beer" button and then click "Begin". The 20 minute brewing stage begins. It starts at 1200 seconds and counts down to zero. If your recipe has "Start" ingredients, they should be added in the first 12 seconds.
For this recipe, I click "Ingredient" three times in a row. Three inventory windows will pop up, all on top of one another. For this recipe, add 15 light malt, 20 medium malt, and 75 honey. Within 12 seconds. That's a little fast for me. It has been my experience that the ingredients are added when I click the "Ingredient" button, so if I'm a little slow, it still works, as long as I don't click "Cancel", which closes that inventory window.
Once the Start ingredients are added, there will some wait time. Some recipes will have "@ 300", or another time label, indicating that you should add those recipes when the 1200-second "Time Left" countdown for the Brewing Stage reaches 300 seconds remaining.
If your recipe has "Finish Ingredients", the timing is a little more tricky. Some consider "Finish" to be in the last 20 seconds. It can be even shorter, in the last 12 seconds of the Brewing Stage. The technique of clicking the "Ingredients" button multiple times for multiple ingredients is particularly useful. There is a pop-up indicating that ingredients have been added, and I have gotten this message well into the fermentation stage without failed results. Another side note: I once clicked the "Max" button when adding an ingredient. Only 200 of the ingredient was added.
Summary: During the "Brewing" 1200 second phase, you add stuff to the kettle at specific times. Alterations to those times or quantities will change the results. A big enough change will give something you don't expect. Sometimes its drinkable, sometimes its not. Completely leaving out an ingredient usually results in a non-drinkable beer.
Fermenting:
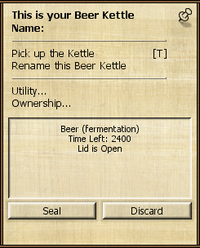
When the Brewing countdown timer reaches zero, the kettle automatically switches to the 40 minute Fermentation stage, which is 2400 seconds long. The Ingredients button also changes to the Seal button. (If there is nothing there, you have probably tried to click "Ingredients" too late and sealed your kettle with no microbes in it. No microbes = No beer. Discard and start again.) The Fermentation Stage starts at 2400 seconds and the timer counts down to zero. Yeasts and other microbes will start entering the kettle as long as the kettle lid is open.
Most locations and their recipes have a "Seal Time". *A kettle sealed before that point will probably not have the needed yeast(s) in it. *A kettle sealed at the correct time will usually contain a single type of yeast (Y56 in our example) which will make beer out of the ingredients you added earlier. *A kettle sealed too late will have additional microbes in it. This can change the final result, but I usually let it finish brewing. *A few locations are suitable for "Open Kettle" recipes and will create beer out of all the microbes that enter during the fermentation stage. They do not need to be sealed until the timer reaches zero and you are ready to put your beer in a small barrel.
After your kettle is sealed, its just a matter of waiting for the timer to reach zero. You can log off. You can leave it there for the rest of the tale (and annoy everybody else who wants to brew beer in that location.) Too many kettles in one spot make it very difficult for other players to drop their kettles and brew beer there. If you choose to leave your kettle, you can make it public. Other players can use your public kettle to make beer, but they cannot move it. But you want your beer, right?
Almost Done!When the timer reaches zero, if you haven't already, click Seal, and then click Take. A window pops up with lots of data about your beer. Consider taking a screenshot or copying it to your clipboard, especially if the results are not what you expected. If you ask someone to help you figure out what went wrong, or how to fix it, all those numbers will help them. The adjectives at the top tell you about your beer.
After you click "Clipboard", click OK. If you have brewed a drinkable beer, a window comes up so you can name what is going into your small barrel. Do your best to be accurate about it. You now have a barrel of beer. If your beer isn't drinkable, the game automatically discards it.
Beer that is still in the kettle does not have an expiration date. It is not at risk of spoiling until it is taken and put in a barrel. If you want to drink your beer, you have a limited amount of time to get it to a tasting table. The higher the alcohol level, the longer it remains drinkable in the barrel. All beers will eventually spoil once they are removed from the kettle. "Spoilage does not affect a beer's fitness for distilling into spirits, ambrosia making, or donating to university research". The T3 wiki also indicates that spoiled beer can be used for the Test of the Banquet.
Please take your kettle with you once you've finished brewing! Once a location looks like this, other players have a very difficult time identifying their kettle and brewing beer. If you prefer to leave your kettle at a spot, put your beer in a small barrel and consider making the empty kettle useable by the public. Your fellow beer brewers thank you!


