Difference between revisions of "Ariella's Setting Up Your Homestead"
m (clean up, typos fixed: You Tube → YouTube) |
|||
| (59 intermediate revisions by 3 users not shown) | |||
| Line 1: | Line 1: | ||
| − | === Using Hotkeys | + | Fixxxer's YouTube Video highlighting life in Egypt! <br> |
| + | https://www.youtube.com/watch?v=Cw2FlfMkWWQ | ||
| + | |||
| + | == Handy wiki links == | ||
| + | |||
| + | https://atitd.wiki/tale9/Attributes <br> | ||
| + | https://atitd.wiki/tale9/Buildings <br> | ||
| + | https://atitd.wiki/tale9/Experience_Master_List <br> | ||
| + | https://atitd.wiki/tale9/Fly_Rods <br> | ||
| + | https://atitd.wiki/tale9/Skills <br> | ||
| + | https://atitd.wiki/tale9/Specializations <br> | ||
| + | https://atitd.wiki/tale9/Technologies <br> | ||
| + | |||
| + | == Using Hotkeys== | ||
In this tutorial we use hotkeys. <br> | In this tutorial we use hotkeys. <br> | ||
You must have Press Enter to Chat showing to use hotkeys. <br> | You must have Press Enter to Chat showing to use hotkeys. <br> | ||
| Line 7: | Line 20: | ||
<br> | <br> | ||
| − | === Setting Out Your Camp == | + | == Using Automato Macros == |
| + | |||
| + | MAKE YOUR GAME LIFE EASIER! <br> | ||
| + | But be warned you must be watching your screen while macroing or you can be sent to game jail by a GM. <br> | ||
| + | Read https://atitd.wiki/tale8/Macro/Automato to make your game life so much easier! <br> | ||
| + | Then Download at https://atitd.wiki/tale8/Macro/Automato/Install <br> | ||
| + | Make sure chats are minimized as in the pic above using Hotkeys. | ||
| + | The most common macro is gather_resources.lua for slate, wood, grass. | ||
| + | |||
| + | == Where to Find Universities and Schools and How to Identify Them == | ||
| + | At each [[Chariot Locations]] there are a complete set of Schools, one for each Discipline. <br> | ||
| + | |||
| + | Universities are scattered in different regions in key locations for Faction game play takeovers. There are 16 Universities of each discipline with a matching School next to each University. Each Uni/School set has a certain look to identify the type by sight. | ||
| + | |||
| + | https://atitd.wiki/tale9/University_and_School_Identification <br> | ||
| + | |||
| + | == Experience List for Leveling == | ||
| + | |||
| + | Print off a handy [[Experience Master List]] that shows what actions gives XP for which skills and levels. | ||
| + | |||
| + | == Setting Out Your Camp == | ||
| + | Do Not Build Next to Roads! <br> | ||
Click yourself/Projects/Make Camp. <br> | Click yourself/Projects/Make Camp. <br> | ||
<br> | <br> | ||
| − | [[File: Make_Camp_menu.png | 300pxs | Left]] | + | [[File: Make_Camp_menu.png | 300pxs|Left]] |
| − | + | ||
| − | |||
Remember you can keep clicking Grab some Flax seeds from your Camp menu. <br> | Remember you can keep clicking Grab some Flax seeds from your Camp menu. <br> | ||
Random strains of Flax seeds will be given to you 3 at a time. <br> | Random strains of Flax seeds will be given to you 3 at a time. <br> | ||
<br> | <br> | ||
| − | [[File: Camp_Made_menu_and_Tasks.jpg | 300pxs | Left]] | + | [[File: Camp_Made_menu_and_Tasks.jpg | 300pxs|Left]] |
You may Self/Utility/Reposition your camp about 3-4 coords, up to 3 times. | You may Self/Utility/Reposition your camp about 3-4 coords, up to 3 times. | ||
| − | [[File: Reposition_Camp_from_Utility_menu.jpg | 300pxs | Left]] | + | [[File: Reposition_Camp_from_Utility_menu.jpg | 300pxs|Left]] |
| − | + | == Build Your Compound (100 Boards + 200 Bricks) == | |
You can also Take materials out of your Cart from your Camp instead of making all of them. <br> | You can also Take materials out of your Cart from your Camp instead of making all of them. <br> | ||
<br> | <br> | ||
[[File:Camp_Mats.jpg|600px|Left]] | [[File:Camp_Mats.jpg|600px|Left]] | ||
| − | + | ||
| − | |||
You will not be able to expand your compound where your door is so face the direction you want your door to face. <br> | You will not be able to expand your compound where your door is so face the direction you want your door to face. <br> | ||
<br> | <br> | ||
| − | [[File: Make_a_Compound_menu.jpg | 200pxs | Left]] | + | [[File: Make_a_Compound_menu.jpg | 200pxs|Left]] |
| − | + | == Processing Wood Into Boards == | |
| − | * Build Your Crafting Bench by raising your Carpentry Skill | + | * Build Your Crafting Bench by raising your Carpentry Skill |
Click on the upper left Skills icon. Make boards to raise the Carpentry Skill. | Click on the upper left Skills icon. Make boards to raise the Carpentry Skill. | ||
| − | [[File: Carpentry_Skill_to_Build_a_Crafting_Bench_Task.jpg | 300pxs | Left]] | + | [[File: Carpentry_Skill_to_Build_a_Crafting_Bench_Task.jpg | 300pxs|Left]] |
You'll need to build a Wood Plane (1 Slate Blade + 4 Slate) from Self/Projects/Carpentry.../Wood Plane. <br> | You'll need to build a Wood Plane (1 Slate Blade + 4 Slate) from Self/Projects/Carpentry.../Wood Plane. <br> | ||
Hold on, we need to also Self/Skills/Knap a Slate Blade. So find a shore and run to find more Slate. Slate can appear where the Mud icon lights up. | Hold on, we need to also Self/Skills/Knap a Slate Blade. So find a shore and run to find more Slate. Slate can appear where the Mud icon lights up. | ||
| − | [[File: Knap_Blade_Build_a_Wood_Plane.jpg | 300pxs | Left]] | + | [[File: Knap_Blade_Build_a_Wood_Plane.jpg | 300pxs|Left]] |
| − | You need to click Build on the icon with all the arrows in the upper left. | + | You need to click Build on the icon with all the arrows in the upper left. <br> |
| + | Build up to 10 more. <br> | ||
| + | Go get lots of slate, over 100, and Knap that into Slate Blades. <br> | ||
| + | Read https://atitd.wiki/tale8/Macro/Automato to make your game life so much easier! <br> | ||
| + | Then Download at https://atitd.wiki/tale8/Macro/Automato/Install <br> | ||
| + | Use gather_resources.lua macro and follow directions. Ask someone in game or Discord if you need help installing or using! <br> | ||
| + | Make sure chats are minimized then hold down the P hotkey and swipe your cursor back and forth over all those wood planes to plane lots of boards quickly. <br> | ||
| + | When a plane isn't working, hover your cursor over the plane and hit the R hotkey. It uses 1 Stone Blade. <br> | ||
| − | [[File: Build_a_Wood_Plane.jpg | 100pxs | Left]] | + | [[File: Build_a_Wood_Plane.jpg | 100pxs|Left]] |
Picking Wood from [[Trees]]. An explanation of Oasis is needed here. <br> | Picking Wood from [[Trees]]. An explanation of Oasis is needed here. <br> | ||
| Line 61: | Line 100: | ||
After picking wood from an oasis, a timer of 2 minutes, 58 seconds starts before you can pick wood from the Oasis again. <br> | After picking wood from an oasis, a timer of 2 minutes, 58 seconds starts before you can pick wood from the Oasis again. <br> | ||
| − | [[File: Wood_Gathering.jpg | 300pxs | Left]] | + | [[File: Wood_Gathering.jpg | 300pxs|Left]] |
Want to pick Wood faster? <br> | Want to pick Wood faster? <br> | ||
| Line 68: | Line 107: | ||
[[File:Fast_Gather_Wood_check_box.jpg |300pxs|Left]] | [[File:Fast_Gather_Wood_check_box.jpg |300pxs|Left]] | ||
| − | Plane 250 Boards to raise your Carpentry Skill to | + | Plane 250 Boards to raise your Carpentry Skill to Level 1. |
| − | [[File: Make_a_Board.jpg | 100pxs | Left]] | + | [[File: Make_a_Board.jpg | 100pxs|Left]] |
Hover over the Carpentry Skill to see your Current Progress so you know how many more boards to make. <br> | Hover over the Carpentry Skill to see your Current Progress so you know how many more boards to make. <br> | ||
| − | [[File: Carpentry_Progress_by_Hovering.jpg | 200pxs | Left]] | + | [[File: Carpentry_Progress_by_Hovering.jpg | 200pxs|Left]] |
And it says at Level 1 we can Make a Crafting Bench! | And it says at Level 1 we can Make a Crafting Bench! | ||
| − | [[File: Carpentry_Skill_Level_1.jpg | 200pxs | Left]] | + | [[File: Carpentry_Skill_Level_1.jpg | 200pxs|Left]] |
Go to the [[Buildings]] page located on the left side of this wiki page to find the cost of a Crafting Bench. <br> | Go to the [[Buildings]] page located on the left side of this wiki page to find the cost of a Crafting Bench. <br> | ||
| Line 85: | Line 124: | ||
Click Build button (will be in the upper left). | Click Build button (will be in the upper left). | ||
| − | [[File: Build_a_Crafting_Bench.jpg | 200pxs | Left]] | + | [[File: Build_a_Crafting_Bench.jpg | 200pxs|Left]] |
Load the materials to finish the Crafting Bench. | Load the materials to finish the Crafting Bench. | ||
| − | [[File: Crafting_Bench_Load_Materials.jpg | 200pxs | Left]] | + | [[File: Crafting_Bench_Load_Materials.jpg | 200pxs|Left]] |
| − | + | == Making Bricks == | |
Make 6 Bricks at a time: 3 Mud + 2 Straw + 1 Sand on a Flimsy Brick Rack.<br> | Make 6 Bricks at a time: 3 Mud + 2 Straw + 1 Sand on a Flimsy Brick Rack.<br> | ||
<br> | <br> | ||
[[File:Brick_Material_List.jpg |550px|Left]] | [[File:Brick_Material_List.jpg |550px|Left]] | ||
| − | + | ||
| − | |||
Hold the Hotkey [B] down while you swipe over multiple Flimsy Brick Racks to go faster!<br> | Hold the Hotkey [B] down while you swipe over multiple Flimsy Brick Racks to go faster!<br> | ||
| Line 112: | Line 150: | ||
[[File:Mud_and_Sand_Icon_near_water.jpg|200px|Left]] | [[File:Mud_and_Sand_Icon_near_water.jpg|200px|Left]] | ||
| − | + | == Expanding Your Compound to 16 Sectors == | |
| − | Next Task is to Expand your compound to 16 Sectors. | + | Next Task is to Expand your compound to 16 Sectors. <br> |
| − | [[File: | + | <br> |
| + | [[File:Compound_to_16_Sectors.jpg|700px]] | ||
<br> | <br> | ||
| − | Click your compound | + | Click your compound to see the Editing Blueprint selections. <br> |
| + | <br> | ||
[[File:Blueprint_Edit_Window.jpg|400px]] | [[File:Blueprint_Edit_Window.jpg|400px]] | ||
[[File:Edit_Blueprint_Initial_Window.jpg|700px]] | [[File:Edit_Blueprint_Initial_Window.jpg|700px]] | ||
| + | |||
| + | Your initial compound starts with 6 sectors, so you need to Add Sector 10 times. <br> | ||
| + | <br> | ||
| + | |||
| + | == Crafting Makes Perfect == | ||
| + | [[File:Water_Water_Everywhere_and_Crafting_Makes_Perfect.jpg | 500px|Left]] | ||
| + | |||
| + | == Water Water Everywhere == | ||
| + | |||
| + | == Specializations == | ||
| + | Click on the Talents Icon at the top of your screen and lengthen your Skills Menu until you see your Talent Points and Specializations listed. | ||
| + | |||
| + | Next click Self/Talents to see the Specialization options. | ||
| + | * Advance Specialization - lists your current Specializations (see your Talents/Skills list too). | ||
| + | * Click Advance Specialization to see the next level's Talent Point cost and which stat/s it will increase. | ||
| + | * Choose Additional Specialization - lists new Specializations you can buy. | ||
| + | * List of Wiki [[Specializations]]. | ||
| + | [[File:Specialization_Menus_and_Icons.jpg|700px|Left]] | ||
| + | |||
| + | == Building Your Guild Hall == | ||
| + | * Players can be in as many Guilds as they want. | ||
| + | * Each player can build their own Guild Hall/s. | ||
| + | * [[Guild Hall]]s have several stages of looks/sizes. | ||
| + | * Allows sharing of buildings/compounds/equipment by using set levels for each guild member. | ||
| + | * Acts as a private group chat for members. | ||
| + | |||
| + | Buy [[Project Management]] 1 from School of Thought (2 Canvas + 6 Rope). <br> | ||
| + | Now build a [[Small Construction Site]] (1 Canvas + 4 Rope + 20 Boards). | ||
| + | * Projects/Construction/Small Construction Site | ||
| + | * This has a large footprint to expand to its maximum size so leave plenty of room away from other buildings, water, hills. | ||
| + | * The builder can choose to Claim the Camp Decoration skill. | ||
| + | * Look at [[Guild Hall]] page to decide on how many members and related costs of boards and bricks it will cost. | ||
| + | * You have 2 hours to load the building materials or Utility/Tear Down if you run out of time and materials will be returned. | ||
| + | * Make this your primary guild if you want. | ||
| + | * Set your Compound/s and/or other buildings and equipment to be guilded under Self/Ownership so your buddies can share. | ||
| + | |||
| + | [[File:Guild_Hall.jpg|600px|Left]] | ||
| + | |||
| + | == Faster Gathering Task and Papyrus Know How == | ||
| + | |||
| + | [[File:Faster_Gathering_Task.jpg|700px|Left]] | ||
| + | |||
| + | This Task leads you into learning how to grow, harvest and dry papyrus so you can make a basket and then a scythe to pick more grass at once. | ||
| + | |||
| + | == Build Sheep Pen == | ||
| + | |||
| + | Get Onion Seeds at a University of Worship. <br> | ||
| + | The other veggie seeds you will need are Carrots, Leeks, Cabbage and Garlic. <br> | ||
| + | Events will give out Cucumbers, Peppers, Watermelon and Eggplant seeds occasionally. <br> | ||
| + | |||
| + | Grow Onions. <br> | ||
| + | If coming in after the Tale start, ask for better crossbred Onion seeds. <br> | ||
| + | |||
| + | Eventually build ranches, get cows, and plow [[Vegetable Field]] that automatically grow the veggies for you. | ||
| + | |||
| + | == Build Camel Pen == | ||
| + | |||
| + | Build a [[Greenhouse]] for fast straw. | ||
| + | |||
| + | == Learn to Make Glass == | ||
| + | |||
| + | Build a [[Fire Pit]] to make Lime and Ash and a tub for Potash for your [[Glass Bench]]. <br> | ||
| + | |||
| + | Second way to make Potash more quickly is building a [[Kettle]]. | ||
| + | Kettles require [[Blacksmithing]] and Medium Stones. | ||
| + | Build a Kitchen to make food to help gather Medium Stones at a public dig. | ||
| + | Eventually Steam Shovels automatically get Medium Stones. | ||
| + | |||
| + | Second way to make Lime and Ash more quickly is through a [[Chemists Bench|Chemist's Bench]]. <br> | ||
| + | Make glass jars, glass rods, copper sheeting and nails for the bench. <br> | ||
| + | |||
| + | {{L|en}} | ||
Latest revision as of 15:08, 13 May 2021
Fixxxer's YouTube Video highlighting life in Egypt!
https://www.youtube.com/watch?v=Cw2FlfMkWWQ
Handy wiki links
https://atitd.wiki/tale9/Attributes
https://atitd.wiki/tale9/Buildings
https://atitd.wiki/tale9/Experience_Master_List
https://atitd.wiki/tale9/Fly_Rods
https://atitd.wiki/tale9/Skills
https://atitd.wiki/tale9/Specializations
https://atitd.wiki/tale9/Technologies
Using Hotkeys
In this tutorial we use hotkeys.
You must have Press Enter to Chat showing to use hotkeys.
Just hit Enter to toggle it on and off.

Using Automato Macros
MAKE YOUR GAME LIFE EASIER!
But be warned you must be watching your screen while macroing or you can be sent to game jail by a GM.
Read https://atitd.wiki/tale8/Macro/Automato to make your game life so much easier!
Then Download at https://atitd.wiki/tale8/Macro/Automato/Install
Make sure chats are minimized as in the pic above using Hotkeys.
The most common macro is gather_resources.lua for slate, wood, grass.
Where to Find Universities and Schools and How to Identify Them
At each Chariot Locations there are a complete set of Schools, one for each Discipline.
Universities are scattered in different regions in key locations for Faction game play takeovers. There are 16 Universities of each discipline with a matching School next to each University. Each Uni/School set has a certain look to identify the type by sight.
https://atitd.wiki/tale9/University_and_School_Identification
Experience List for Leveling
Print off a handy Experience Master List that shows what actions gives XP for which skills and levels.
Setting Out Your Camp
Do Not Build Next to Roads!
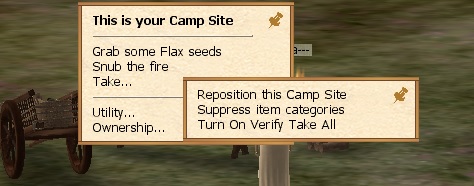
Click yourself/Projects/Make Camp.
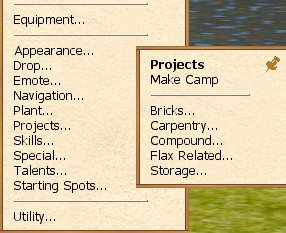
Remember you can keep clicking Grab some Flax seeds from your Camp menu.
Random strains of Flax seeds will be given to you 3 at a time.
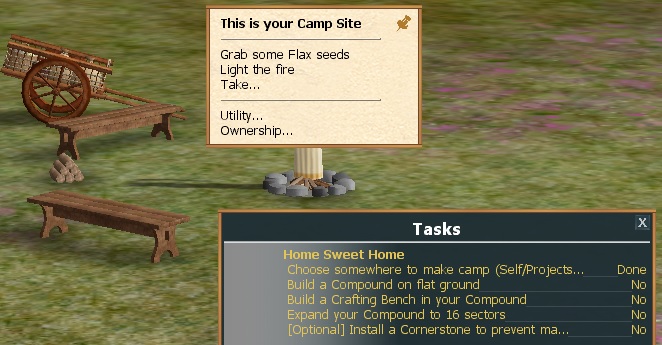
You may Self/Utility/Reposition your camp about 3-4 coords, up to 3 times.
Build Your Compound (100 Boards + 200 Bricks)
You can also Take materials out of your Cart from your Camp instead of making all of them.

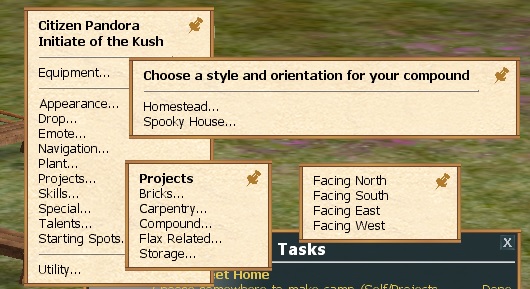
You will not be able to expand your compound where your door is so face the direction you want your door to face.
Processing Wood Into Boards
- Build Your Crafting Bench by raising your Carpentry Skill
Click on the upper left Skills icon. Make boards to raise the Carpentry Skill.
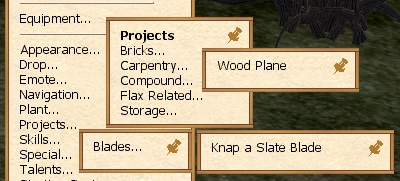
You'll need to build a Wood Plane (1 Slate Blade + 4 Slate) from Self/Projects/Carpentry.../Wood Plane.
Hold on, we need to also Self/Skills/Knap a Slate Blade. So find a shore and run to find more Slate. Slate can appear where the Mud icon lights up.
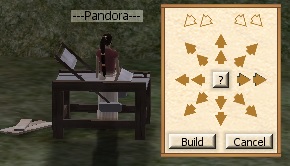
You need to click Build on the icon with all the arrows in the upper left.
Build up to 10 more.
Go get lots of slate, over 100, and Knap that into Slate Blades.
Read https://atitd.wiki/tale8/Macro/Automato to make your game life so much easier!
Then Download at https://atitd.wiki/tale8/Macro/Automato/Install
Use gather_resources.lua macro and follow directions. Ask someone in game or Discord if you need help installing or using!
Make sure chats are minimized then hold down the P hotkey and swipe your cursor back and forth over all those wood planes to plane lots of boards quickly.
When a plane isn't working, hover your cursor over the plane and hit the R hotkey. It uses 1 Stone Blade.
Picking Wood from Trees. An explanation of Oasis is needed here.
An Oasis in this game can be 1 - 12 flora (trees, plants, thorns) in a group.
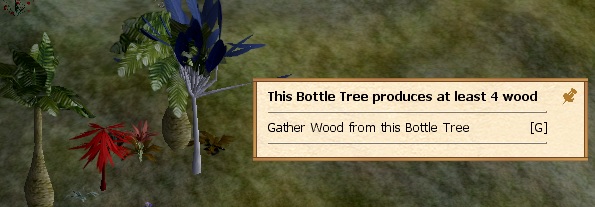
In the pic below there is an Oasis of 4 trees and several plants.
Each Oasis group has a chance of spawning an herb.
The pic below says the Bottle Tree will give you 4 Wood. But why do you get 16 Wood when you click Gather?
If you check out the Trees wiki page you will see that some trees produce 1 wood and a few 4 wood.
As of Tale 9, instead of Gathering from each tree separately, you gather from ALL the trees in the oasis group at once.
So whichever tree you click on, the amount of Wood for that tree x the number of trees in the Oasis group is what you receive.
To Gather Wood from all the trees within an Oasis group you can click on any of the trees within the group.
After picking wood from an oasis, a timer of 2 minutes, 58 seconds starts before you can pick wood from the Oasis again.
Want to pick Wood faster?
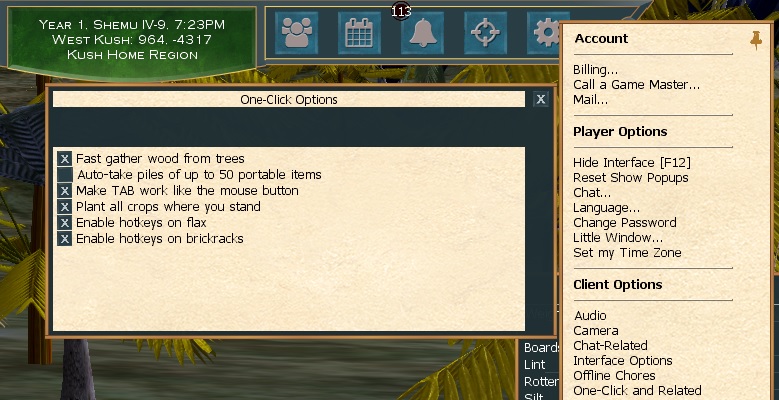
Click the gear icon on the far right top/One Click and Related/Check Fast gather wood from Trees
Click on a tree and it gathers all the wood without a tree menu popping up.
Plane 250 Boards to raise your Carpentry Skill to Level 1.
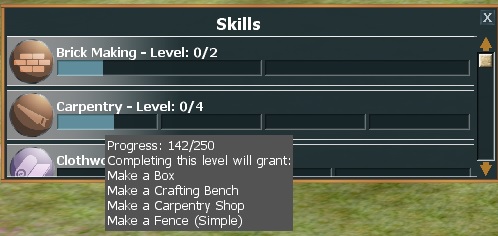
Hover over the Carpentry Skill to see your Current Progress so you know how many more boards to make.
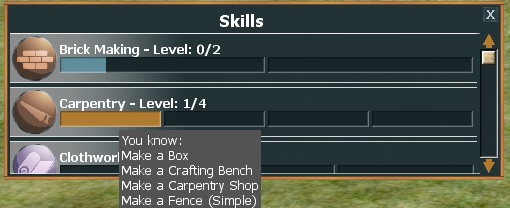
And it says at Level 1 we can Make a Crafting Bench!
Go to the Buildings page located on the left side of this wiki page to find the cost of a Crafting Bench.
Click the compound edge/Projects/Carpentry.../Crafting Bench.
A blue shade over a grid of squares shows the footprint of the new machine.
Click Build button (will be in the upper left).
Load the materials to finish the Crafting Bench.
Making Bricks
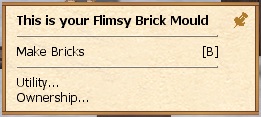
Make 6 Bricks at a time: 3 Mud + 2 Straw + 1 Sand on a Flimsy Brick Rack.

Hold the Hotkey [B] down while you swipe over multiple Flimsy Brick Racks to go faster!
You make Straw from Grass.
Pick Grass by clicking on a far spot and then hitting 1 over and over when the grass icon lights up.
Drop Grass and it turns into Straw. Click to Pick up the Straw. Dropping smaller amounts converts Grass into Straw faster.
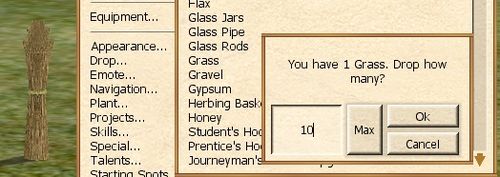
The Mud icon lights up when you get near water. Click to gather mud. Sand is anywhere. Click Sand icon to gather.
Expanding Your Compound to 16 Sectors
Next Task is to Expand your compound to 16 Sectors.
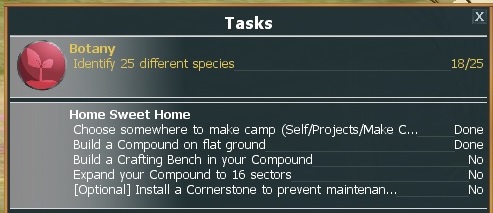
Click your compound to see the Editing Blueprint selections.
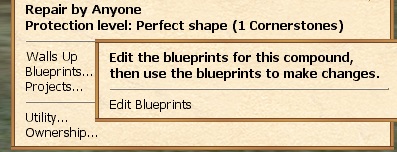
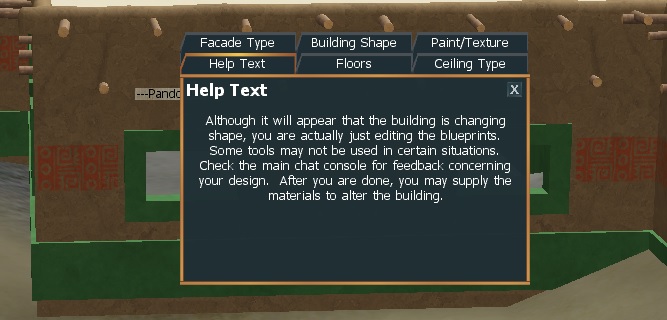
Your initial compound starts with 6 sectors, so you need to Add Sector 10 times.
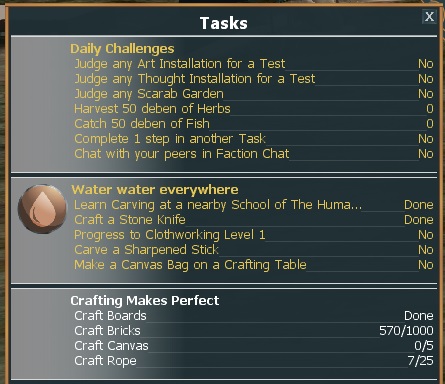
Crafting Makes Perfect
Water Water Everywhere
Specializations
Click on the Talents Icon at the top of your screen and lengthen your Skills Menu until you see your Talent Points and Specializations listed.
Next click Self/Talents to see the Specialization options.
- Advance Specialization - lists your current Specializations (see your Talents/Skills list too).
- Click Advance Specialization to see the next level's Talent Point cost and which stat/s it will increase.
- Choose Additional Specialization - lists new Specializations you can buy.
- List of Wiki Specializations.
Building Your Guild Hall
- Players can be in as many Guilds as they want.
- Each player can build their own Guild Hall/s.
- Guild Halls have several stages of looks/sizes.
- Allows sharing of buildings/compounds/equipment by using set levels for each guild member.
- Acts as a private group chat for members.
Buy Project Management 1 from School of Thought (2 Canvas + 6 Rope).
Now build a Small Construction Site (1 Canvas + 4 Rope + 20 Boards).
- Projects/Construction/Small Construction Site
- This has a large footprint to expand to its maximum size so leave plenty of room away from other buildings, water, hills.
- The builder can choose to Claim the Camp Decoration skill.
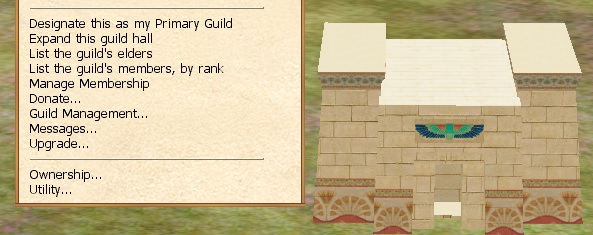
- Look at Guild Hall page to decide on how many members and related costs of boards and bricks it will cost.
- You have 2 hours to load the building materials or Utility/Tear Down if you run out of time and materials will be returned.
- Make this your primary guild if you want.
- Set your Compound/s and/or other buildings and equipment to be guilded under Self/Ownership so your buddies can share.
Faster Gathering Task and Papyrus Know How
This Task leads you into learning how to grow, harvest and dry papyrus so you can make a basket and then a scythe to pick more grass at once.
Build Sheep Pen
Get Onion Seeds at a University of Worship.
The other veggie seeds you will need are Carrots, Leeks, Cabbage and Garlic.
Events will give out Cucumbers, Peppers, Watermelon and Eggplant seeds occasionally.
Grow Onions.
If coming in after the Tale start, ask for better crossbred Onion seeds.
Eventually build ranches, get cows, and plow Vegetable Field that automatically grow the veggies for you.
Build Camel Pen
Build a Greenhouse for fast straw.
Learn to Make Glass
Build a Fire Pit to make Lime and Ash and a tub for Potash for your Glass Bench.
Second way to make Potash more quickly is building a Kettle. Kettles require Blacksmithing and Medium Stones. Build a Kitchen to make food to help gather Medium Stones at a public dig. Eventually Steam Shovels automatically get Medium Stones.
Second way to make Lime and Ash more quickly is through a Chemist's Bench.
Make glass jars, glass rods, copper sheeting and nails for the bench.
